MHub as an Organiser
If you are appointed "Organiser" in the MeetingHub, extended functionality will be available for you.
You will get Organiser role by either being appointed by the ECO staff) or when you are the Chair of a group.
Managing a meeting
If you are appointed organiser rights on the MeetingHub, these options will be available to you:
Please see detailed WIKI for description.
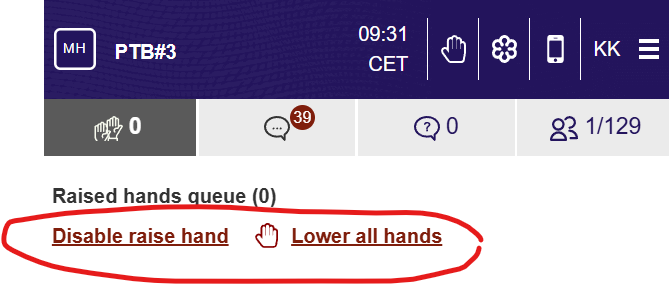
Raise Hand
You will be able to lower a participants hand individually, or all raised hands at once.
You can also “close” the floor by clicking the “Disable raise hand” - this will disable the raise hand button at all participants.
Chat
You will be able to download a chat log for all public messages. Private messages between users and between organisers are not possible to download.
Live Questions
You will be able to create new Live Questions and manage the results their display to the audience. See section for information how to create a Live Question
Participant List
You will be able to remove participants from the list, Please note the users are able to connect again and will appear on the list again. This function can assist in making a valid participants list.
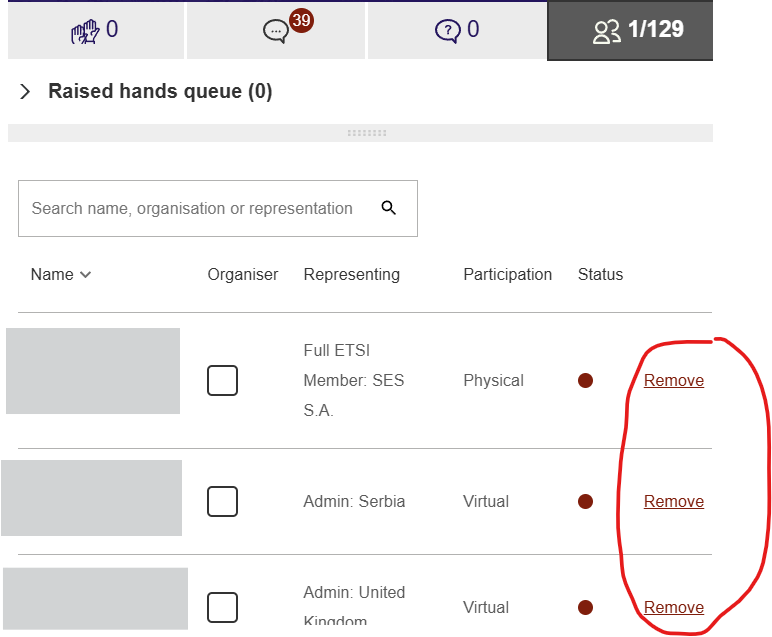
On this list you will also be able to edit the participants - if the participation information in “open” meetings (like breakout sessions), if a meeting is linked to a meeting planned on the CEPT portal , this will not be possible as the information is received from the portals meeting registration.
Manage Live Questions
If you are appointed the Organiser role in MeetingHub, you can create and handle Live Questions (LQ).
Live Questions are a simple way to ask questions to all participants in the MeetingHub.
You can ask a single question, and participants can be presented with options to answer either single-choice of multi-choice.
Result can be published, or only shown to organisers.
Also answers can be collected anonymously.
How to setup and use
The process of handling LQ is divided into these tasks:
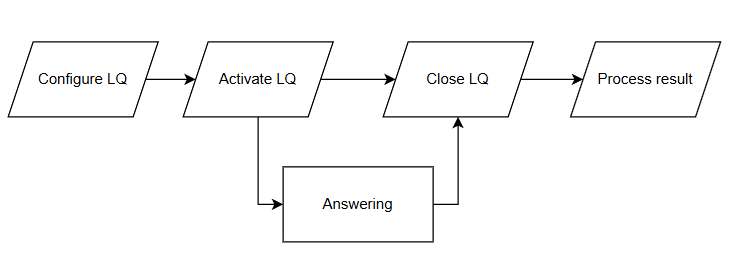
Example setup of LQ
|
Step / Action |
Description |
|
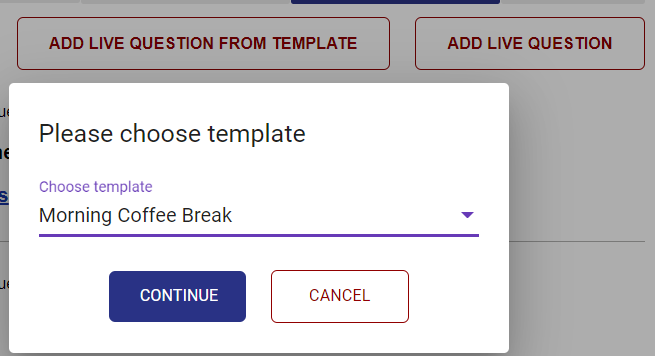
There are two ways to create a LQ, either from a template , or from scratch. When you create a LQ, you have the option to save it as an template in the current meeting. Click either the "Add Live Question" or "Add live question from template".
|
|
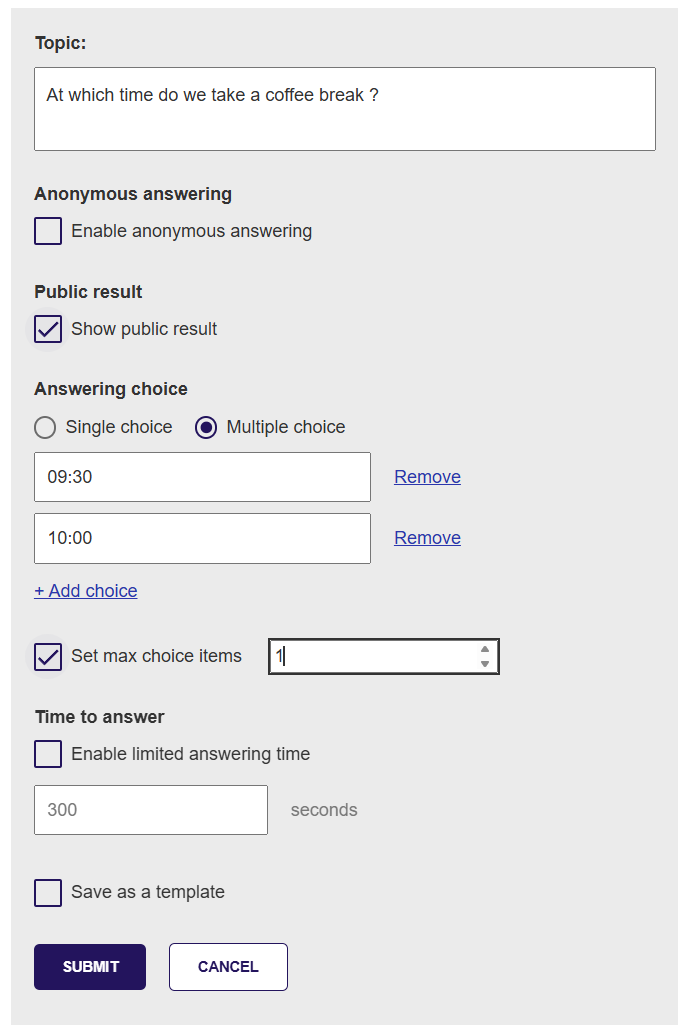
Description of the fields is provided at the end of this page. When the LQ is configured and "Submit" is clicked, the LQ is ready to be activated and presented to the participants.
It is not visible to the participants until it is activated (see next step).
See field description at the end of this page.
|
|
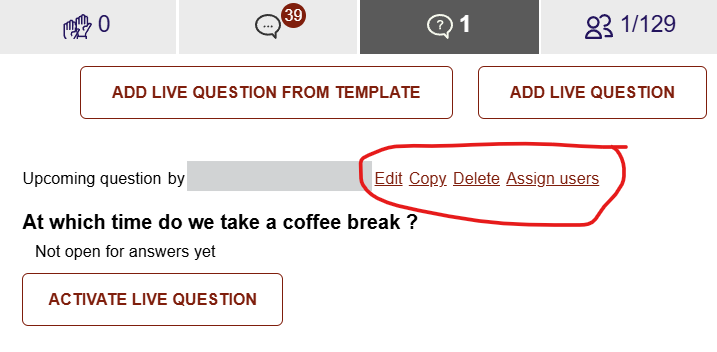
3. Assign respondents
|
If only a subset of participants are required to answer the LQ, you can assign those by clicking the "Assign users" option next to the LQ.
Please note that the LQ will be visible to all participants in the meeting, but only the selected participants can answer.
|
|
Remember, the LQ will not be visible to participants before it is activated.
When you click “activate” the LQ will be locked from editing - no further changes are possible.
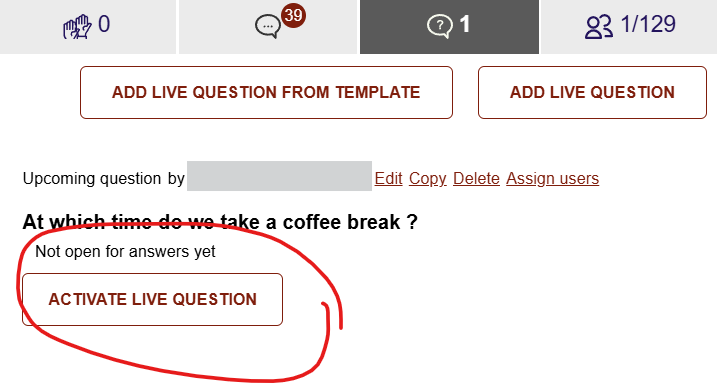
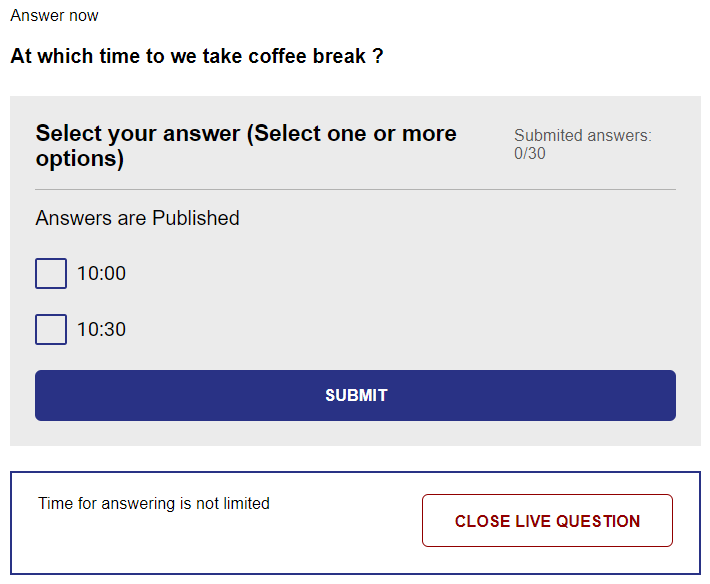
Click "Activate Live Question" to publish it to the participants. You will be asked to confirm the activation.
Please be aware that ONLY one LQ can be active at a time. If the "Activate" button is not visible another question is already active.
|
|
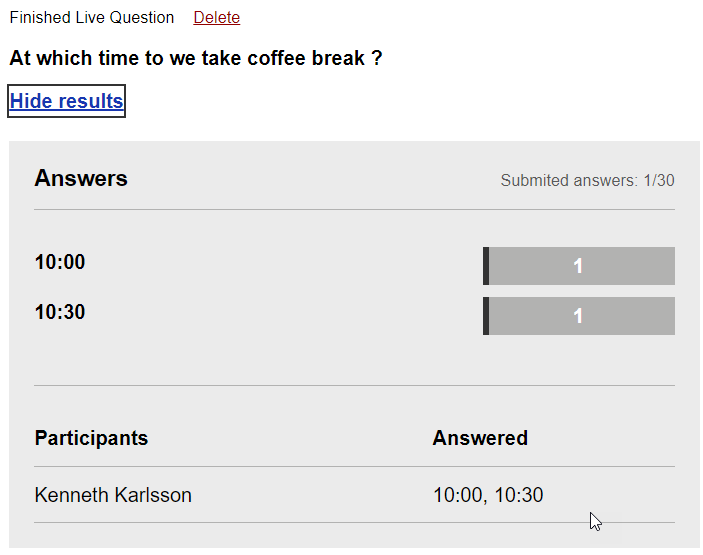
If you have configured the LQ with a limited answering time, the LQ will automatically close when the period is over. Otherwise you will have to close the LQ when you see fit. Click the "Close Live Question" to end the answering period. The panel to close the question is only visible to participants with organiser role.
You will be asked to confirm the closure of the LQ. Please note, a closed LQ can not be activated again.
|
|
When the LQ is closed, the answers will be published , if the relevant setting of the LQ has been properly ticked. If the LQ has been configured NOT to publish the answers, only organisers will be able to see the result. If the LQ has been configured to publish the answers, all participants will be able to see the result. If a LQ has been configured as Anonymous, the system does not record who provided the individual answers. Therefore nobody can see who answered what.
|
The properties to be set for a LQ
|
Property |
Definition |
|
Topic |
This is the question asked
|
|
Anonymous answering
|
If selected, the system will not record any information on the user who provided the answer.
|
|
Public result
|
If selected - the result will be published when the LQ is closed. If this is not selected, only participants with the organiser role can see the results. |
|
Answering choice
Set max choice items |
The LQ can be configured as either a single-choice or multiple-choice. Based on this setting, the respondent can select one or more of the listed answering choices. The organiser can include several answering choices for the LQ through the dedicated "+ Add choice" function.
If multiple choice is selected, it is also possible to indicate a maximum number of options to be selected. Example: there are 3 choices, but the respondent is only allow to select 2. Respondent can then select any answers but only 2 and can swap as they want. |
|
Time to answer |
The LQ can be time limited. If selected the LQ will only be open for the indicated duration (in seconds), and it will automatically close afterwards.The LQ still need to be activated to start the timer. If this is not set, the organiser is responsible to close the LQ when appropriate. |
|
Save as Template |
If you have recurring questions, you can save the LQ as a template. In this way you can easy and quickly create a new LQ based on the same setup. Give the template a short descriptive name. You cannot edit a template. |
Manage Raise Hands
All participants are able to manage their own "Raise Hand" indication, that means they can raise and lower their request when needed.
If you are appointed in the Organiser role, you will also have the option to manage other participants hand indications.
These following options will be available to you:
-
Next to each participants names on the right - the "Lower hand" and "Give Floor" option will be visible
-
At the top of the list commands to lower all hands or disable raise hands (close the floor) in one click is shown.
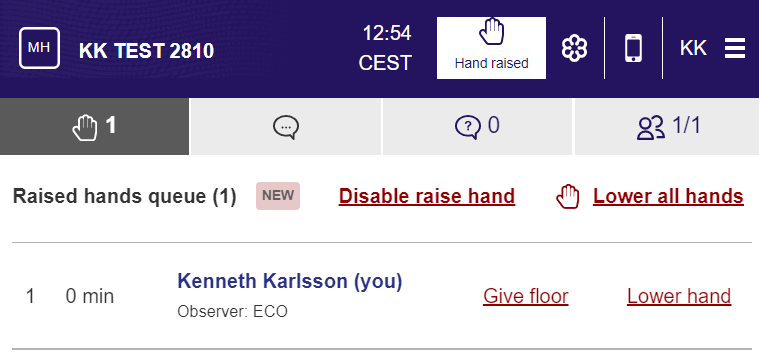
The "give floor" option will display the selected users name and affiliation in the window. When the user lower their hand or you as organiser gives the floor / lowers hand the indication will disappear.

Manage Participants List
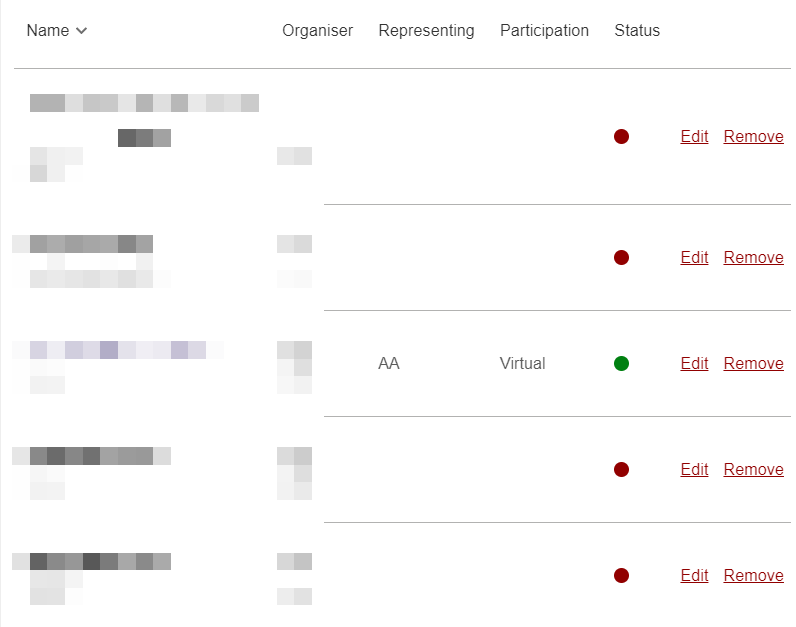
Only ECO can appoint a participant to become an organiser in the MeetingHub, therefore the "Organiser" tick box will remain grey even if you are appointed organiser - this is by design.
You can as an organiser maintain the participant list, you can edit the participation info for open meetings (i.e. breakout sessions and non-linked meetings to CEPT portal) , and you can remove participants which are not attending the meeting (please note this will not prevent the participant to re-enter the meeting). Use the “Edit “ or "Remove" link option for this.
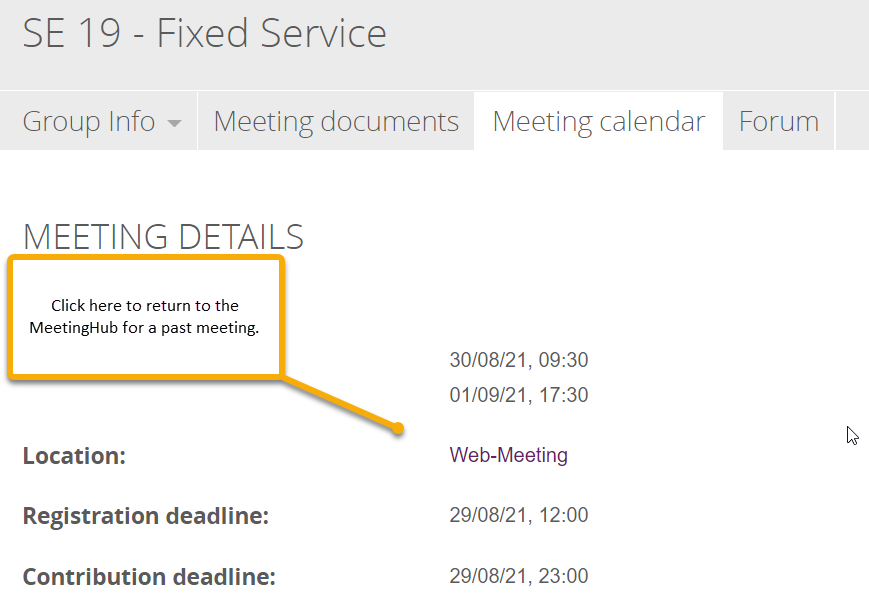
If you need to get the participants list from a past meeting and the meeting is no longer listed on your "My Meetings" page on the CEPT portal - you will need to find the details of the meeting and click the "Webmeeting" link. Please note that a cleanup-routine is done regularly (180 days), and the data may therefore no longer be available.
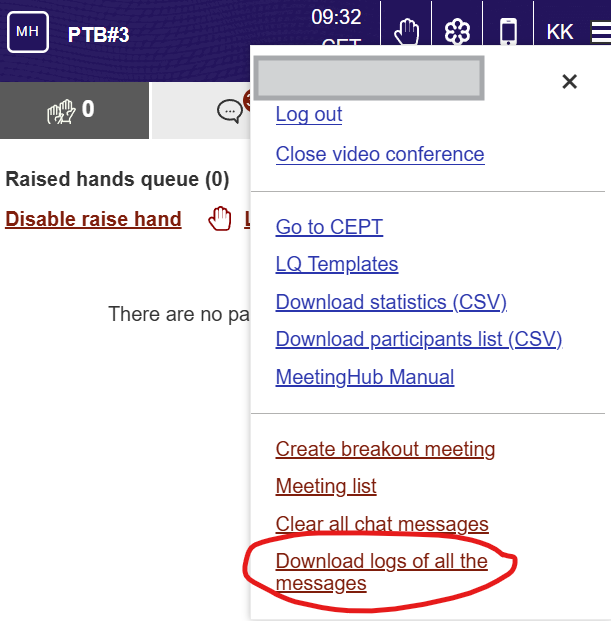
Manage Chat
As an organiser you are able to download a log of all PUBLIC messages.
Please note NO private chats will be included in the downloaded logfile - this is by design.
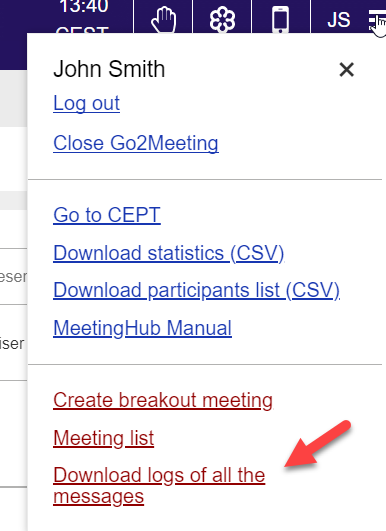
The file is downloaded as en CSV file containing various data:
